Woohoo I got an email from Stacey last night saying I am one of the lucky Blockheads Paper Arts blog candy winners awarded this week!
19 April 2012
18 April 2012
'Magic Metal' Technique Blog Hop Challenge
I also made this card for
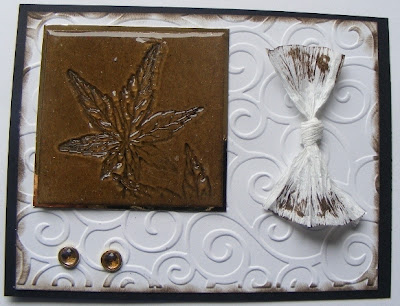
Blockheads 'Magic Metal' Technique Blog Hop Challenge using their Maple Leaves Stamp!
Cut a piece of card to fit the stamp. Using Versamark completely cover the card.
Using ultrathick embossing powder springle over the inked card and melt with heat tool, repeat this about three or four times to get a nice thickness to stamp your stamp into, once you have done this press the stamp onto the melted embossing powder while its hot to get a nice impression!
I cut a piece of mirror board slightly bigger and attached it to the embossed melted card. I used a piece of white cardstock and run this through my Cuttlebug using a embossing folder and edged with Tim Holtz Distressed Ink, Walnut Stain. I attached this to black cardstock, then added two gold brads and some white raffer tied in a knot and edged also with Distressed Ink, Walnut Stain.
17 April 2012
'Magic Metal' Technique Blog Hop Challenge!
I made this card for
Blockheads 'Magic Metal' Technique Blog Hop Challenge!
Cut a piece of card to fit the stamp. Using Versamark completely cover the card. Using ultrathick embossing powder springle over the inked card and melt with heat tool, repeat this about three or four times to get a nice thickness to stamp your stamp into, once you have done this press the stamp onto the melted embossing powder while its hot to get a nice impression! I cut a piece of mirror board slightly bigger and attached it to the embossed melted card. I used a piece of white cardstock and run this through my Cuttlebug using a embossing folder, I attached this to black cardstock firstly attaching the gold fibre and gold brads.
Cut a piece of card to fit the stamp. Using Versamark completely cover the card. Using ultrathick embossing powder springle over the inked card and melt with heat tool, repeat this about three or four times to get a nice thickness to stamp your stamp into, once you have done this press the stamp onto the melted embossing powder while its hot to get a nice impression! I cut a piece of mirror board slightly bigger and attached it to the embossed melted card. I used a piece of white cardstock and run this through my Cuttlebug using a embossing folder, I attached this to black cardstock firstly attaching the gold fibre and gold brads.
Subscribe to:
Comments (Atom)
With Love card
Hi everyone, welcome to my blog! https://leighsbdesigns.com/b/valentine-slimline-decorative-digi-paper-pack To make my card I used Mixed u...

-
Hi everyone, welcome to my blog! Creative Inspiration Challenges We have a new Challenge #30 - our sponsor this month is Tracy Evans Bo...
-
Hi everyone! Day 1 of Poe Appreciation Day Blog Hop, hosted by Leigh Snaith-Brunton Jan 19-23 - 2018 The most POE-full time of the yea...
-
Hi everyone, welcome to my blog! We have a new Challenge #27 our sponsor this month is SheepSki Designs using her wonderful images! Fuchs...


